Showing posts with label chocolate. Show all posts

Tuesday, March 26, 2013

Chocolate cream

After a long absence I have to be forgiven somehow.
So we'll talk about chocolate.:)
The first cocoa tree was cultivated by the Mayans and then the Aztecs. It was used as a drink in religious rituals and as a form of payment. After the discovery of America, it was brought to Europe, where it became a very popular drink in the courts. Later it became an economic product and everyone has been able to appreciate all the qualities and goodness.

"The cocoa bean is a gift, that nature is no longer able to repeat, because you can
never find so many qualities only in one fruit".
Alexander von Humboldt (1769-1859)

by Carmen

Dopo una lunga assenza devo farmi perdonare in qualche modo.
Quindi parleremo del cioccolato. :)
La prima pianta di cacao venne coltivata dai Maya e poi dagli Aztechi. Veniva utilizzato come bevanda nei riti religiosi e come forma di pagamento. Dopo la scoperta dell’America venne portata in Europa, dove divenne una bevanda molto apprezzata nelle corti. Successivamente divenne un prodotto economico e ognuno pote’ apprezzarne tutte le qualita’ e la bonta’.

"La fava di cacao è un dono, che la natura non è più riuscita a ripetere; infatti non si
sono mai più trovate così tante qualità in un solo frutto.“
AlexAnder von Humboldt (1769-1859)

Chocolate cream

400 ml of milk
100 ml of fresh cream
5 egg yolks
200 gr of chocolate
70 gr of sugar
30 gr corn flour

Combine the milk and cream in a pan and boil gently.
Mix the egg yolks with sugar and corn flour.
Pour the milk and cream into the mixture and stir. Put everything on low heat and let thicken.
Cut the pieces of chocolate and put it in the hot mixture and let it melt. Put the pot on the stove for a few seconds and let thicken.
Put the cream in tray or container. Cover the surface with plastic wrap and let cool. Put the cream in the fridge and use it for your own creations. It’s also good on its own!

Crema pasticciera al cioccolato
400 ml di latte
100 ml di panna fresca
5 tuorli d’uovo
200 gr di cioccolato
70 gr di zucchero
30 gr farina di mais


Unite il latte e la panna in una pentola e fate bollire leggermente.
Mescolate i tuorli d’uovo con lo zucchero e la farina di mais.
Versate il latte e la panna nel composto e mescolate. Rimettete il tutto sul fuoco basso e fate addensare.
Tagliate il cioccolato a scaglie e mettetelo nel composto caldo e fatelo sciogliere. Rimettete la pentola sul
fuoco per qualche secondo e fate addensare.
Mettete la crema in vassoio o recipiente. Coprite la superficie con la pellicola trasparente e lasciatela raffreddare. Mettete la crema nel frigo e utilizzatela per le vostre creazioni. E’ buona anche da sola!

Thursday, July 26, 2012

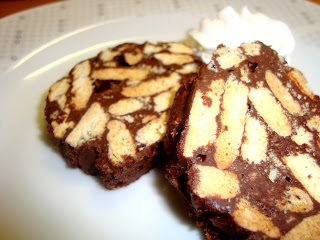
Chocolate Salami

An easy and tasty dessert. Impossible to resist! :)
Sweet day to you all!

Un dolce facile e gustoso. Impossibile resistere! :)
Dolce giornata a tutti!
by Carmen
Chocolate Salami
250 g biscuits
120 g butter
3 yolks egg
100 g sugar
200 g dark chocolate
2 tablespoons rum

First of all, let the butter out of the fridge so that it softens at room temperature. In the meanwhile, crumble the biscuits in a large bowl. Melt the chocolate a baine-marie and knead it with a spoon, until it becomes creamy and without lumps, let it cool down.
When the butter is quite soft, knead the cream in with a spatula, gradually adding sugar, eggs, melted chocolate and rum.
Mix it well and pour the mixture into the bowl where you have crumbled biscuits, stirring and mixing thoroughly. Now take the dough that is shaped like a salami. You can get a big sausage with all the dough or, dividing the dough, two smaller ones.
To give it the classic form of salami, you put the dough on a baking sheet that you roll pressing the dough to give it a cylindrical shape. Then wrap the chocolate salami pressed in aluminum foil and place in refrigerator until it is wrapped so hard (at least two or three hours), then it will be ready to be sliced ​​and served. It can be stored in the freezer.

by Carmen
Salame al cioccolato
250 gr biscotti secchi
120 gr burro
3 tuorli d’uovo
100 gr zucchero
200 gr cioccolato fondente
2 cucchiai di Rum

Per prima cosa lasciate il burro fuori dal frigorifero in modo che si ammorbidisca a temperatura ambiente. Intanto sbriciolate i biscotti secchi in un ciotola capiente. Sciogliete a bagnomaria il cioccolato fondente e lavoratelo con un mestolo, fino a che diventi cremoso e senza grumi; lasciatelo raffreddare.
Quando il burro sarà abbastanza morbido, lavoratelo a crema con una spatola, aggiungendo a mano a mano lo zucchero, le uova, il cioccolato sciolto e il Rum.
Amalgamate bene il composto ottenuto e versatelo nella ciotola dove avete sbriciolato i biscotti, mescolando e amalgamando bene il tutto. Ora date all’impasto la forma di un salame. Potete ottenere un grosso salame con tutto l’impasto oppure, dividendo l’impasto, due più piccoli.
Per dargli la classica forma del salame, dovete mettere l’impasto in un foglio di carta forno che arrotolerete pressando l’impasto per conferirgli forma cilindrica. Avvolgete poi il salame di cioccolato pressato nella carta d’alluminio e mettetelo in frigorifero così avvolto fino a quando sarà indurito(almeno due o tre ore); poi sarà pronto per essere tagliato a fette e servito. Puo’ essere conservato anche in congelatore.

Wednesday, April 18, 2012

Truffles and chocolates with hazelnut


"The only way to get rid of temptation is to yield to it... I can resist everything but temptation." Oscar Wilde

"L'unico modo per liberarsi di una tentazione è cedere ad essa ... Posso resistere a tutto tranne che alle tentazioni." Oscar Wilde


chocolate with hazelnut
by Carmen

Truffles and chocolates with hazelnut
150 g dark chocolate
100 g milk chocolate
150 ml fresh cream
rum
hazelnuts
cocoa

Chop the milk chocolate finely and the dark chocolate as well.
Put the cream in a saucepan and let it almost boil.
Turn off the heat and add the chocolate to the cream. Mix together until mixture is smooth.
Put the mixture into a bowl and add some rum.
Let the mixture cool down.
Once cooled, place it in the fridge for an hour and a half.
After the interval, remove the mixture from the refrigerator. Form small balls with your hands. In some of them place a whole nut and make the ball with the help of the palm. In this way you have the whole nut in the center.
Arrange the balls on a tray covered with baking paper and place them in refrigerator for an hour.
In the meanwhile, chop the remaining nuts with a knife.
After one hour has gone by, take out your chocolate balls from the fridge. Dip the hazelnuts balls in the hazelnuts you have just chopped. Roll the other balls instead in cocoa powder to form your truffles.
Put your chocolates in a container and store in the refrigerator ... if some of them remain... : D!

  
Truffels
by Carmen
Tartufi e cioccolatini alla nocciola
150 gr cioccolato fondente
100 gr cioccolato latte
150 ml di panna fresca
Rum
Noccioline
Cacao amaro

Tagliate finemente il cioccolato a latte e quello fondente.
Mettete la panna in un pentolino e fategli raggiungere quasi il bollore.
Spegnete ora il fuoco e aggiungete alla panna il cioccolato tagliato. Mescolate il tutto fino a ottenere un composto omogeneo.
Mettete il composto in un recipiente e aggiungete del rum a piacere.
Lasciate che il composto si raffreddi.
Una volta raffreddato mettetelo nel frigo per un’ora e mezza circa.
Trascorso il tempo, togliete il composto dal frigo. Formate con le mani delle piccole palline. In alcune mettete una noce intera in un po’ di composto e con l’aiuto del palmo della mano formate la pallina. In questo modo avete al centro la noce intera.
Disponete le palline su un vassoio ricoperto con carta da forno e mettetele in frigo per un’ora.
Nel frattempo tritate le noci rimaste con un coltello.
Trascorsa l’ora, togliete le vostre palline di cioccolato dal frigo. Passate le palline con la noce nelle noci appena tritate. Le altre palline, invece, rotolatele nel cacao amaro in modo da formare i vostri tartufi.
Ponete i vostri cioccolatini in un contenitore e conservateli in frigo… se ne rimane qualcuno :D!!

Thursday, March 1, 2012

Chocolates (cioccolatini ripieni)

I really think you understood that chocolate is one of my passions.
And after having made chocolate cakes and small sweets, I could not miss the chocolates. 
And - considering it was my first time - they ended up to be very good!
Here's the recipe! Let try it!

Credo proprio che avete capito che il cioccolato è una delle mie passioni.
E dopo aver fatto torte al cioccolato e piccoli dolcetti, non potevano mancare i cioccolatini.
E per essere stata la mia prima volta, sono venuti molto bene.
Ecco a voi la ricetta! Provatela!

by Carmen
Chocolates
150 g fresh cream
150 g milk chocolate
150 g dark chocolate
30 g of butter (optional)

Melt the chocolate in a bain-marie  Once it is melted, fill the molds (the silicone ones are perfect) with the melted chocolate and then remove it from the mold, so that it remains a thin chocolate layer on the walls. Put the mold in the refrigerator or freezer if you want to accelerate the solidification process.
by Carmen
Now we prepare the cream ganache. Let the cream warm up in a pan. Then turn the heat off just before it reaches a boiling point. Add some chocolate pieces and mix it all to melt the chocolate and obtain a cream. Doses can be changed. If you want a thicker filling, increased the amount of chocolate or decrease the amount of cream.
Let  the mixture cool. In the meanwhile, work the butter until it becomes creamy and add it to the ganache. If you want, you can also add the liqueur at your leisure.
Remove the mold from the fridge and fill it with the ganache, leaving a little margin that will serve to cover. Put the mold in the refrigerator for about an hour.
Melt  the remaining dark chocolate again in a bain-marie. Remove the mold from the fridge again and cover it with melted chocolate, leveling it with a spatula.
Put the mold in the fridge for at least 2 hours.
After you can take off your chocolates from the mold.

by Carmen
Cioccolatini ripieni
150 gr panna fresca
150 gr cioccolato al latte
150 gr cioccolato fondente
30 gr di burro (facoltativo)

Sciogliete il cioccolato fondente a bagnomaria. Una volta sciolto riempite gli stampini ( quelli in silicone sono perfetti) con il cioccolato fuso e poi eliminatelo dallo stampo in modo che rimanga uno strato sottile di cioccolato alle pareti. Mettete lo stampo in frigo oppure nel congelatore se volete accelerare il processo di solidificazione.
Ora prepariamo la crema ganache. Fate riscaldare la panna in una pentola. Poi spegnete la fiamma un po’ prima che raggiunga il bollore. Aggiungete il cioccolato a pezzi e mescolate il tutto fino a far sciogliere il cioccolato e ottenere una crema. Le dosi possono essere cambiate. Se si desidera un ripieno più denso aumentate la quantità del cioccolato o diminuite la quantità della panna.
Fate raffreddare il composto. Nel frattempo lavorate il burro a crema e aggiungetelo alla crema ganache. Se volete, potete anche aggiungere anche del liquore a vostro piacere.
Togliete lo stampo dal frigo e riempitelo con la crema ganache lasciando un po’ di margine che servirà per la copertura. Rimettete lo stampo nel frigo per circa un’ora.
Risciogliete il cioccolato fondente rimasto a bagno maria. Togliete nuovamente lo stampo dal frigo e copritelo con il cioccolato fuso, livellandolo con una spatola.
Rimettete lo stampo in frigo per almeno 2 ore.
Dopo potete togliere i vostri cioccolatini dallo stampo.

Tuesday, February 21, 2012

Mini chocolate and walnuts brownies


For chocolate lovers like me … mini chocolate and walnuts brownies.
A sweet day to you all!

Per gli amanti del cioccolato come me … I mini brownies al cioccolato e noci.
Una dolce giornata a tutti!

by Carmen

Mini chocolate and walnuts brownies 
60 g milk chocolate
45 g butter
125 g icing sugar
1 teaspoon vanilla extract
1 egg
40 g flour
15 g cocoa powder
1 teaspoon baking powder
60 g walnuts

Let the chocolate melt in a bain-marie.
Mix the butter, sugar and vanilla separately. Add the egg and continue to mix it well. Add the chocolate gradually to the mixture.
Now add the sifted flour with the cocoa and the baking powder. Afterwards, add the walnuts chopped previously.
Pour the mixture in a rectangular baking tin covered with baking paper.
Bake at 180 degrees for 35 minutes.
Remove it from the oven, then cut it into squares, and then serve it.
Taste them with some cream or some ice cream.


Mini brownies al cioccolato e noci
60 gr cioccolato al latte
45 gr burro
125 gr zucchero a velo
1 bustina vanillina
1 uovo
40 gr farina
15 gr cacao amaro
1 cucchiaino di lievito
60 gr noci

Fate sciogliere il cioccolato a bagnomaria.
Lavorate, a parte, il burro, lo zucchero e la vanillina. Aggiungete l’uovo e continuate ad amalgamare bene il tutto. Unite al composto il cioccolato a filo.
Aggiungete ora la farina setacciata insieme al cacao e al lievito. Dopo unite anche le noci precedentemente tagliate grossolanamente.
Versate il composto in una teglia rettangolare coperta con della carta da forno.
Infornate a 180 gradi per 35 minuti.
Toglietela dal forno e tagliatela a quadratini e servite.
Gustateli anche con della panna o del gelato.

Saturday, January 21, 2012

Chocolate Terrine

I do not know if in your original country is this cold now, but here it definitely is. And when it's cold the thing that comes to my mind is chocolate! I believe that's the same for many of you also!
That is why today I want to propose you a dessert which is impossible to resist: the terrine with chocolate! Try it with cream, it is delicious.

Non so dalle vostre parti ma qui fa freddo. E quando fa freddo la cosa che mi viene subito in mente è cioccolata!!! Credo che anche a molti si voi! 
Ed è per questo che oggi voglio proporvi un dolce al quale è impossibile resistere: la terrina al cioccolato! Provatela con la panna, è deliziosa.

by Carmen

Chocolate Terrine
3 whites egg
100 g sugar
1 teaspoon of vanilla essence
70 g flour
140 g dark chocolate
Fresh milk q.b.

Whip the whites egg with the vanilla and half of the sugar. 
Meanwhile, let the chocolate melt in a bain-marie. Once cooked, add the remaining sugar, flour and mix to it. Add a bit of milk until the mixture is creamy. 
Now add the mixture in spoonfuls of egg whites. Try to mix top-down in rotation so that the eggs white does not sink. 
Now take a rectangular cake pan and cover it with some baking paper. Arrange the mixture on it and bake it in the oven at 180 degrees for 30-40 minutes. 
I do not recommend it too dry, check the cooking after 30 minutes
Remove it from the oven when it is ready and let it stand. Sprinkle the surface with icing sugar and serve with some cream. Delicious!! :) 

Terrina al cioccolato
by Carmen
3 albumi
100 gr zucchero
1 bustina vanillina
70 gr farina
140 gr cioccolato fondente
Latte fresco q,b

Montate a neve gli albumi con metà dello zucchero e la vanillina. Nel frattempo fate sciogliere il cioccolato a bagnomaria. Una volta pronto aggiungete ad esso lo zucchero rimasto, la farina e amalgamate. Aggiungete un po’ di latte fino ad ottenere un impasto cremoso. Ora aggiungete all’impasto i bianchi montati a cucchiaiate. Cercate di mescolare dall’alto verso il basso in modo rotatorio in modo da non far smontare l’albume. 
Ora prendete una tortiera rettangolare e copritela con carta da forno. Disponete su di essa il composto e fate cuocere al forno a 180 gradi per 30-40 minuti.
Consiglio di non farla asciugare troppo, controllate la cottura dopo 30 minuti.
Una volta pronta toglietela dal forno e lasciatela riposare. Cospargete la superficie di zucchero a velo e servitela con un po’ di panna. Deliziosa!! :)


Sunday, December 11, 2011

Simple biscuits for simple Christmas gifts


Christmas is approaching and we ought to think about gifts... I'm sure that for many of you, like me, the time of the gifts is a critical moment: tight schedules, few ideas and sometimes a limited budget. So I have taken the time to think about it and I have decided that this year I want to do something special, easy and not expensive. So what about cooking? I thought I would make some biscuits, buy some nice decorations and make gift boxes with a bit of fantasy… It will definitely be an appreciated thought for the most glutton friends and relatives. Today I propose delicious biscuits to you. They are very easy to make! We prepare two different types of biscuits but with the same mixture… but I leave the creativity to you for the decoration! Ready? Let's go!

Natale si avvicina e bisogna pensare ai regali. Sono sicura che per molti di voi, come per me, il momento dei regali e’ un momento critico: poco tempo, poche idee e a volte budget limitato. Quindi mi sono fermata a pensare e ho deciso che quest’anno bisogna fare qualcosa di speciale, facile e poco costoso. E allora che ne dite di mettersi ai fornelli? Ho pensato di preparare dei biscotti, comprare delle decorazioni carine e con un po’ di fantasia fare dei pacchetti regalo. Sara’ sicuramente un pensiero apprezzato per gli amici e i parenti piu’ golosi. Oggi vi propongo dei biscotti buonissimi e facilissimi da fare! Prepariamo due tipi di biscotti diversi ma con lo stesso impasto... per la decorazione, pero’, lascio a voi la creativita’! Pronti? Let’s go!

Wednesday, December 7, 2011

Cake with dark chocolate flakes and almonds


Here it is my first recipe. A delicious cake for breakfast or snack. I have done it yesterday and now it’s already gone L J... I wait for your comments and suggestions. To the next recipe!
Ecco a voi la mia prima ricetta. Una buonissima torta per la prima colazione o la merenda. Io l’ho fatta ieri e ora e’ gia’ finita L J.. aspetto i vostri commenti e suggerimenti. Alla prossima ricetta!

Cake with dark chocolate flakes and almonds.
160 gr sugar
100 gr butter
2 large eggs or 3 small / medium
1 vanilla essence
200 gr flour
150 ml milk
1 tablespoon of bitter cocoa
20 gr dark chocolate
20 gr almond flakes

Cut the butter (ambient temperature) into small pieces, whip with a whisk or electric mixer until creamy, then add the sugar while continuing to beat. Add the eggs one at a time always beating the mixture until completely merged. Add the vanilla essence and then the sifted flour and milk. Stir the mixture with a wooden spoon. Once you get the mixture, divide it into two bowls: in one part of the mixture add the cocoa with a bit of milk and stir well and finally add the almonds; add the chocolate (previously cut into small pieces) in the other mixture. Butter and flour a plum cake mold. First pour the white mixture in the mold and then the chocolate mixture. Bake in preheated oven at 180 degrees for 40-45 minutes, (the cooking time depends on the oven) prick the cake with a toothpick to make sure the cooking: if the toothpick is dry, the cake will be ready to be baked . Remove it from the oven and let cool, remove from the mold and dusted with powdered sugar.
Excellent with a good cup of Italian coffee!
by Carmen 

Torta con scaglie di cioccolato fondente e mandorle.

160 gr zucchero

100 gr burro

2 uova intere grandi o 3 medio/ piccole

1 bustina vanillina

200 gr farina

150 ml latte

1 cucchiaio di cacao amaro

20 gr di cioccolato fondente

20 gr di mandorle a scaglie

Tagliare il burro (temperatura ambiente) a pezzetti, sbattetelo con una frusta o sbattitore elettrico fino a ottenere una crema, poi unire lo zucchero continuando a sbattere. Unite le uova una per volta sempre sbattendo fino ad amalgamarle al composto. Unite la bustina di vanillina e dopo la farina setacciata e il latte. Mescolate il composto con un cucchiaio di legno. Una volta ottenuto il composto dividetelo in due ciotole: in una parte del composto aggiungete il cacao con un altro po’ di latte e mescolate bene e in ultimo le mandorle; nell’altro aggiungete la cioccolata precedentemente tagliata a pezzetti. Imburrate e infarinate uno stampo da plum cake. Versate per primo il composto bianco e infine il composto al cioccolato. Cuocete nel forno preriscaldato a 180 gradi per 40-45 minuti, (il tempo di cottura è variabile in base al forno.) accertatevi della cottura punzecchiando la torta con uno stecchino; se quando l’estrarrete sarà asciutto, la torta sarà pronta per essere sfornata. Estraetela dal forno e lasciate raffreddare, toglietela dallo stampo e spolverate di zucchero a velo.
Ottima con una buona tazza di caffe’ italiano!