Showing posts with label recipes. Show all posts

Thursday, August 22, 2013

Red fruits cheesecake

by Carmen
Red fruits cheesecake

150 gr dry biscuits
120 gr butter
1 tablespoon cocoa
1 tablespoon icing sugar
175 gr ricotta cheese
175 gr fresh cheese
150 gr of red fruit jam
4 sheets of gelatin

Chop finely the dry biscuits with the cocoa and icing sugar. Pour the mixture into a bowl.
Melt the butter. Let it cool. After incorporate it into the biscuit’s mixture and stir.
Pour the mixture into a mold with hinges, covered with baking paper. Distribute it evenly with the help of a spoon.
Put the mold in the fridge for 20 minutes.
Put the gelatin sheets in cold water and let them soften.
Mix ricotta and cheese in a bowl. Add the jam and mix well.
Melt the gelatin over a gentle heat. Pour in the mixture and mix well.
Remove the mold from the fridge, pour the mixture just prepared, over the biscuit base. Put the mold in the fridge and let it rest for at least 2 hours or longer before serving.

by Carmen
Cheesecake ai frutti rossi

150 gr biscotti secchi
120 gr burro
1 cucchiaio di cacao
1 cucchiaio di zucchero a velo
175 gr ricotta
175 gr formaggio fresco
150 gr marmellata di frutti rossi
4 fogli di gelatina

Tritate i biscotti finemente insieme al cacao e lo zucchero a velo. Versate il composto in una ciotola.
Fate sciogliere il burro. Lasciatelo raffreddare. Dopo incorporatelo nel composto di biscotti e mescolate.
Versate il composto in uno stampo a cerniere rivestito con carta da forno. Distribuitelo in modo uniforme con l’aiuto di un cucchiaio.
Mettete lo stampo in frigo per 20 minuti.
Mettete i fogli di gelatina in acqua fredda e lasciateli ammorbidire.
Mescolate la ricotta e il formaggio in una ciotola. Aggiungete la marmellata e mescolate bene.
Fate sciogliere i fogli di gelatina a fiamma dolce. Versate nel composto e mescolate bene.
Togliete lo stampo dal frigo, versate il composto appena preparato sulla base di biscotti. Rimettete lo stampo in frigo e fate riposare il tutto per almeno 2 ore o piu’ prima di servire.

Tuesday, July 30, 2013

Cous cous with vegetables

A delicious dish for a summer day.
Un delizioso piatto per un giorno d'estate.

by Carmen
Cous cous with vegetables
(4 people)

300 ml water
200 gr couscous
1 courgette
1 shallot
40 gr of pine nuts
40 gr of olives taggiasche
5 sun-dried tomatoes
basil
mint
Salt and pepper
Half lemon zest
Olive oil

Let boil 300 ml of water, put in it the couscous. Turn off the heat and cover it with a lid.
Meanwhile, heat some oil in a frying pan. Cut the shallot and brown it in the hot oil. Cut the courgette and add it to the pan. Cook for about 5-10 minutes.
Now shell the couscous with a fork and transfer it into a large bowl.
Season with the fried courgette, chopped tomatoes, pine nuts and olives.
Chop mint and basil. Add them to the cous cous, add also some pepper and salt. 
Finally, add the grated lemon zest. Mix everything together and serve.
You can store the couscous in the fridge.

Cous cous alle verdure
(4 persone)

300 ml acqua
200 gr cous cous
1 zucchina
1 scalogno
40 gr di pinoli
40 gr di olive taggiasche
5 pomodori secchi
Basilico
Menta
Sale e pepe
Mezza buccia di limone grattugiata
Olio di oliva

Portate a ebollizione i 300 ml di acqua, mettere il cous cous. Spegnere il fuoco e coprite con un coperchio.
Nel frattempo riscaldate un po d’olio in una padella. Tagliate lo scalogno e fatelo rosolare nell’olio caldo. Tagliate la zucchina e unitela al soffritto. Lasciate cuocere per circa 5-10 minuti.
Ora sgranate con una forchetta il cous cous e trasferitelo in una ciotola capiente.
Conditelo con il soffritto di zucchine, i pomodori tagliati, i pinoli e le olive.
Tagliuzzate la menta e il basilico. Uniteli al cous cous insieme a un po’ di pepe e sale. 
Infine la buccia grattugiata del limone. Mescolate il tutto e servite. 
Si puo’ conservare il cous cous anche in frigo.

Friday, June 7, 2013

Biscotti del faraone

Today I propose you a biscuit with traditional flavors. I would say almost Egyptian flavours... I made cookies with Kamut flour, an ancient Egyptian wheat. It is part of Gramineae’s family, it turns out to be more tolerated by people with wheat intolerance. And it is also considered one of the most complete cereals in terms of nutrition.

Oggi vi propongo un biscotto dai sapori antichi. Direi quasi Egizii..Ho preparato dei biscotti con farina di Kamut, antichissimo grano egizio. Fa parte della famiglia delle graminacee ma risulta essere piu’ tollerato da chi soffre di intolleranza al grano. E’ considerato inoltre uno dei cereali piu’ completi dal punto di vista nutrizionale. 

by Carmen
Pharaoh Cookies

160 gr kamut flour
60 g butter
110 gr brown sugar
60 g hazelnuts
60 g unpeeled almonds
1 small egg
Half a teaspoon ground cinnamon
Half vanilla bean or 1 sachet

Work the butter with the sugar until the mixture is smooth. Then add one egg.
Add the flour, cinnamon and vanilla. Mix all ingredients but not too much. At the end add the whole hazelnuts and almonds.
Shape a 3 cm high tile with the dough. You can use a small baking sheet covered with parchment paper. Let the dough firm up in the fridge for a couple of hours.
Cut half-centimeter thick slices with a knife and bake them at 170 degrees for 10-15 minutes.

Biscotti del faraone

160 gr farina di kamut
60 gr burro
110 gr zucchero di canna grezzo
60 gr nocciole
60 gr mandorle non pelate
1 uovo piccolo
Mezzo cucchiaino cannella in polvere
Mezzo baccello di vaniglia o 1 bustina

Lavorate il burro con lo zucchero fino a ottenere un impasto liscio. Dopo aggiungere l’uovo.
Aggiungere la farina, la cannella e la vaniglia. Lavorare il tutto, ma non troppo, per amalgamare tutti gli ingredienti. Aggiungere in fine le nocciole e le mandorle intere.
Con l’impasto formate una mattonella alta 3 centimetri. Potete utilizzare una piccola teglia coperta con carta da forno. Fate rassodare il panetto in frigo per un paio di ore.
Tagliate con il coltello delle fettine spesse mezzo centimetro e cuocete in forno a 170 gradi per 10-15 minuti.

Monday, December 3, 2012

Potatoes and parsnips with garlic cream

The parsnip is a root vegetable related to the carrot. The root looks similar to a carrot but is creamy white in colour. The parsnip has a sweeter taste, especially when cooked.

La pastinaca è una radice legata alla carota. La radice è simile a una carota, ma è di colore bianco crema. La pastinaca ha un sapore più dolce, soprattutto se cotta.

by Carmen

Potatoes and parsnips with garlic cream
3 large potatoes
3 medium parsnips
200 ml cream or soya cream
100 ml milk or soya milk
2 garlic cloves
Some grated nutmeg
75 gr grated cheese
Salt
Black pepper
Some butter for greasing

Peel the potatoes and the parsnips and cut them into thin slices. Place them in a steamer and cook for 5 minutes.
Meanwhile pour the cream and the milk in a pan, add also the crushed garlic and the nutmeg, let boil. Remove the pan from the heat and leave to stand for about 10 minutes. Grease a rectangular baking dish with butter and preheat the oven to 180 degreeds.
Arrange the sliced potatoes and parsnips in layers in the baking dish. Sprinkling each layer with some salt and black pepper.
Take out the garlics from the cream. Pour the garlic flavoured cream into the baking dish and then press the layers. The liquid should come underneath the top layer of vegetables. Cover the dish with a piece of baking parchment and bake for 40 minutes.
Remove the dish from the oven and sprinkle the grated cheese. Put again in the oven and bake for 20-30 minutes or until the topping is golden brown.

Patate e pastinaca con crema all’aglio
3 patate grandi
3 pastinache medie
200 ml di panna o crema di soia
100 ml di latte o latte di soia
2 spicchi di aglio
Un po' di noce moscata grattugiata
75 gr di formaggio grattugiato
sale
pepe nero
Una noce di burro per ungere

Sbucciate le patate e le pastinache e tagliarle a fettine sottili. Metterli in una pentola a vapore e cuocere per 5 minuti o in pentola con acqua.
Nel frattempo versare la panna e il latte in un tegame, aggiungere anche l'aglio schiacciato e la noce moscata, lasciate bollire. Togliere la padella dal fuoco e lasciate riposare per circa 10 minuti. Imburrate una teglia rettangolare da forno con burro e preriscaldare il forno a 180 gradi
Disporre le patate e pastinache a strati nel piatto di cottura. Cospargete ogni strato con un po 'di sale e pepe nero.
Togliere l’aglio dalla crema. Versare la crema di aglio aromatizzato nella teglia e quindi premere i livelli. Il liquido dovrebbe scendere sotto lo strato superiore di verdure. Coprite il piatto con un pezzo di carta da forno e cuocere per 40 minuti.
Togliere il piatto dal forno e cospargere con il formaggio grattugiato. Mettere di nuovo in forno e fate cuocere per 20-30 minuti o fino a quando la parte superiore è dorata.

Tuesday, November 20, 2012

Autumn salad

A delicious autumn dish. Serve with rice or cous cous or simply with good bread .. maybe home-made by you :) you can find the recipe of bread  here !! Enjoy!

Un delizioso piatto autunnale. Da servire con del riso o cous cous o semplicemente con del buon pane..magari fatto in casa da voi :) puoi trovare la ricetta del pane qui !! Buon divertimento!

by Carmen
Autumn salad
1 small bio squash
5/6 small shallots
100 gr walnuts
60 gr feta cheese
Some leaf fresh parsley
Fresh thyme
Olive oil
2 spoons of balsamic vinegar
1 fresh red chill
1 small garlic clove
Sea salt
Black pepper

Preheat the oven to 190C. Peeled the shallots but left whole. Put them in a roasting pan or ovenproof dish with the chopped chill. Season with olive oil, balsamic vinegar, salt and pepper. Roast for 15 minutes, stirring once or twice.
Peeled, seeded and cut into chunks the small squash. Add it in the pan and roast for about 30-35 minutes, stirring once, until it is tender and browned. Remove from the oven and let it aside to cool.
Chop the parsley, the thyme and the garlic together and mix with the walnuts.
Stir the mixture into the vegetables. Crumble the feta cheese and add to the salad. Transfer to a serving dish and serve immediately.

by Carmen
Insalata autunnale
1 zucca piccola bio
5/6 piccoli scalogni
100 gr di noci
60 gr formaggio feta
Alcune foglie fresche di prezzemolo
timo fresco
olio d'oliva
2 cucchiai di aceto balsamico
1 peperoncino rosso fresco
1 piccolo spicchio d'aglio
sale
pepe nero

Preriscaldare il forno a 190C.
Pelate gli scalogni ma lasciateli interi. Metteteli in una teglia o pirofila con il peperoncino tritato. Condire con olio d'oliva, aceto balsamico, sale e pepe. Fate scuocere per 15 minuti, mescolando una o due volte.
Pelate, private ​​dei semi e tagliate a pezzi la zucca piccola.
Aggiungetela nella pirofila e cuocere per circa 30-35 minuti, mescolando una volta, fino a quando la zucca non sara’ tenera e rosolata. Togliere dal forno e lasciate da parte a raffreddare.
Tritare il prezzemolo, il timo e l'aglio insieme e mescolate il tutto con le noci.
Mescolare il composto con le verdure. Sbriciolare il formaggio feta e aggiungetelo nell'insalata.
Trasferire in un piatto da portata e servite subito.

Monday, October 15, 2012

Spaghetti alla carbonara


A classic italian recipe, it's famous all over the world
Un classico della cucina italiana conosciuta in tutto il mondo.

by Carmen

Spaghetti Carbonara
 350 gr of spaghetti
3 egg yolks
1 whole egg
150 gr of bacon or pancetta
80 grams of pecorino or Parmesan cheese (for a more delicate taste)
black pepper
salt

Boil the water for the pasta.
Fry the bacon in a frying pan.
Beat the whole egg and egg yolks in a bowl. Add the cheese and black pepper.
Salt the cooking water and cook the spaghetti.
Drain them al dente and put them in the bowl and mix at the previously prepared sauce. Put the bacon in the meantime.
Serve immediately.


Spaghetti alla carbonara
350 gr di spaghetti
3 tuorli d’uovo
1 uovo intero
150 gr di guanciale o pancetta
80 gr di pecorino o parmigiano (per un sapore piu’ delicato)
Pepe nero
sale

Mettere a bollire l’acqua per la pasta.
Fate rosolare in una padella il guanciale.
Sbattete l’uovo intero e i tuorli in una ciotola. Unite il formaggio e il pepe nero.
Salate l’acqua di cottura e fate cuocere gli spaghetti.
Scolateli al dente e metteteli nella ciotola e ammalgamatela alla salsa precedentemente preparata. Unite nel frattempo anche il guanciale.
Servite immediatamente

Thursday, July 26, 2012

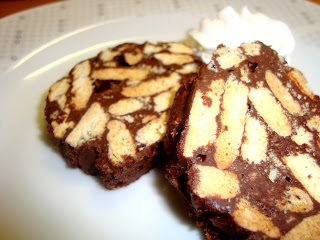
Chocolate Salami

An easy and tasty dessert. Impossible to resist! :)
Sweet day to you all!

Un dolce facile e gustoso. Impossibile resistere! :)
Dolce giornata a tutti!
by Carmen
Chocolate Salami
250 g biscuits
120 g butter
3 yolks egg
100 g sugar
200 g dark chocolate
2 tablespoons rum

First of all, let the butter out of the fridge so that it softens at room temperature. In the meanwhile, crumble the biscuits in a large bowl. Melt the chocolate a baine-marie and knead it with a spoon, until it becomes creamy and without lumps, let it cool down.
When the butter is quite soft, knead the cream in with a spatula, gradually adding sugar, eggs, melted chocolate and rum.
Mix it well and pour the mixture into the bowl where you have crumbled biscuits, stirring and mixing thoroughly. Now take the dough that is shaped like a salami. You can get a big sausage with all the dough or, dividing the dough, two smaller ones.
To give it the classic form of salami, you put the dough on a baking sheet that you roll pressing the dough to give it a cylindrical shape. Then wrap the chocolate salami pressed in aluminum foil and place in refrigerator until it is wrapped so hard (at least two or three hours), then it will be ready to be sliced ​​and served. It can be stored in the freezer.

by Carmen
Salame al cioccolato
250 gr biscotti secchi
120 gr burro
3 tuorli d’uovo
100 gr zucchero
200 gr cioccolato fondente
2 cucchiai di Rum

Per prima cosa lasciate il burro fuori dal frigorifero in modo che si ammorbidisca a temperatura ambiente. Intanto sbriciolate i biscotti secchi in un ciotola capiente. Sciogliete a bagnomaria il cioccolato fondente e lavoratelo con un mestolo, fino a che diventi cremoso e senza grumi; lasciatelo raffreddare.
Quando il burro sarà abbastanza morbido, lavoratelo a crema con una spatola, aggiungendo a mano a mano lo zucchero, le uova, il cioccolato sciolto e il Rum.
Amalgamate bene il composto ottenuto e versatelo nella ciotola dove avete sbriciolato i biscotti, mescolando e amalgamando bene il tutto. Ora date all’impasto la forma di un salame. Potete ottenere un grosso salame con tutto l’impasto oppure, dividendo l’impasto, due più piccoli.
Per dargli la classica forma del salame, dovete mettere l’impasto in un foglio di carta forno che arrotolerete pressando l’impasto per conferirgli forma cilindrica. Avvolgete poi il salame di cioccolato pressato nella carta d’alluminio e mettetelo in frigorifero così avvolto fino a quando sarà indurito(almeno due o tre ore); poi sarà pronto per essere tagliato a fette e servito. Puo’ essere conservato anche in congelatore.

Tuesday, July 3, 2012

Tart with vanilla cream and red fruits


Today I want to propose you a wonderful dessert for the eyes and the palate.
It Includes two basic recipes of Italian pastry: The pastafrolla (with which you can make delicious biscuits) and the vanilla cream.
And so, we just have to start.
Have a tasty dessert you all!
I forgot: you can store the pastafrolla in the freezer for 365 days.


Oggi voglio proporvi un dolce meraviglioso per gli occhi e per il palato.
Comprende due ricette base della pasticceria italiana: la pastafrolla (con la quale potete fare dei buonissimi biscotti) e la crema pasticcera alla vaniglia.
E allora non ci resta che iniziare.
Buon dolce a tutti!
Dimenticavo: l’impasto della pastafrolla si puo’ conservare nel congelatore per 365 giorni.

by Carmen

Tart with vanilla cream and red fruits

Pastafrolla
120 gr butter
2 gr salt
90 gr icing sugar
15 gr almond flour
1 egg
240 gr flour
Vanilla
Lemon zest

Work the butter to cream. Add the  sugar, the egg and the salt. Work everything well. Then add the almond flour and a bit of flour. When the dough becomes homogenous, add the remaining flour. Work the dough well but not too much. Cover it with plastic film and let it rest in the fridge for about 1 hour. When the dough is hardened, spread it with the matterello and cut in the desired shape.
Bake it in the oven at 150 degrees for 15 minutes.

Vanilla cream
500 ml milk
5 yolks eggs
150 gr sugar
40 gr flour
Vanilla
Lemon zest

Let the milk boil with the vanilla and the lemon zest.
Mix the eggs, the sugar and the flour in a bowl. Pour the warm milk in it and mix it well with a whip.
Put everything on the fire and mix it until the formation of the cream.
Put the cream in a tray or in a dish and cover it with plastic film. Let it cool and then put it in the fridge.

Assembling the dessert
Pastafrolla
Vanilla cream
Strawberries
Red fruits
Icing sugar
20 gr dark chocolate

Put the pastafrolla disk in a plate. Melt the chocolate in a bain-marie. Brush the disk with the chocolate and put it in the fridge for 2 minutes.
Put the cream in a sac a poche. Fill the disk. Decorate it with strawberries and red fruits. Sprinkle it with icing sugar and serve.

Wednesday, May 2, 2012

Tuna croquettes with thyme

A delicious starter, it is easy to prepare.
Good lunch to you all!

Uno sfizioso antipasto, facile da preparare.
Buon pranzo a tutti voi!

by Carmen

Tuna croquettes with thyme
200 g canned tuna
2 eggs
100 g of bread crumbs
50 g stoned green olives
Thyme
Pepper
Olive oil for frying
Put the drained tuna from the oil to a bowl. Add about 60 g of breadcrumbs and other ingredients. Combine everything well until the dough is smooth.
Form your croquettes and pass them in the remaining breadcrumbs.
Put some oil in a frying pan and heat it. Now put your croquettes. Let them fry for about 2 minutes. After this, turn them and let them fry for another 2 minutes. When they take on a golden color, remove them from the pan. Put them on a plate covered with paper towels.
Serve and enjoy!

Polpette di tonno al profumo di timo
200 gr tonno in scatola
2 uova
100 gr di pan grattato
50 gr olive verdi snocciolate
Timo
Pepe
Olio di oliva per friggere
Mettete in una coppa il tonno sgocciolato dall’olio. Aggiungete circa 60 gr di pan grattato e tutti gli altri ingredienti. Unite il tutto per bene fino a ottenere un impasto omogeneo.
Formate le vostre polpette e passatele nel pan grattato rimasto.
Mettete un po’ di olio in una padella antiaderente e fatelo riscaldare. Ora mettete le vostre polpette. Fatele friggere per circa 2 minuti. Dopo giratele e fatele friggere per altri 2 minuti. Quando assumono un colore dorato potete toglierle dalla padelle. Ponetele su un piatto coperto da carta assorbente.
Servite e gustate!